Last updated on October 20th, 2025 at 08:23 am
If you’ve ever wondered “What’s in his stack?” — I’ve shared it all in one place.
👉 See my best picks
Creating a standout avatar for your YouTube channel or social media platforms can set you apart. With advancements in AI, it’s easier than ever to craft a custom avatar that aligns with your brand or content. In this guide, we’ll walk you through a step-by-step process to create a stunning token avatar using free tools. Let’s get started.
Step 1: Crafting the Perfect Avatar Prompt with AI
The first step in your journey is generating a detailed prompt that describes your avatar. For this, you can use powerful AI tools like ChatGPT or Gemini by Google. These platforms will help you define every aspect of your avatar’s appearance, from the style to the setting.
Key Elements to Include in Your Avatar Description:
- Style: Whether you want a modern, anime, or abstract look.
- Clothing and Accessories: Specify the type of attire, from casual to formal.
- Background: Choose a setting like a sleek studio or a dynamic outdoor scene.
For example, you might describe an avatar in modern attire, looking directly at the camera with a professional studio backdrop.
👉📌Related:80 Best Faceless YouTube channel ideas
Step 2: Using AI Image Generators to Bring Your Avatar to Life
Once you’ve crafted the perfect prompt, the next step is to generate your avatar using AI-based image generators. Platforms such as Leonardo.ai or Playground provide a range of customizable options, allowing you to create a unique visual that represents you.
Steps for Using AI Image Generators:
- Visit your preferred image generator.
- Paste the prompt you created in step one.
- Click “Generate” and let the AI produce several stunning visuals.
- Review the results and select your preferred option, then download it.
Step 3: Refine Your Avatar Using Canva

With your AI-generated avatar downloaded, it’s time to fine-tune the image. Canva is an excellent platform for this, offering a range of editing tools to perfect your avatar’s appearance.
How to Edit Your Avatar in Canva:
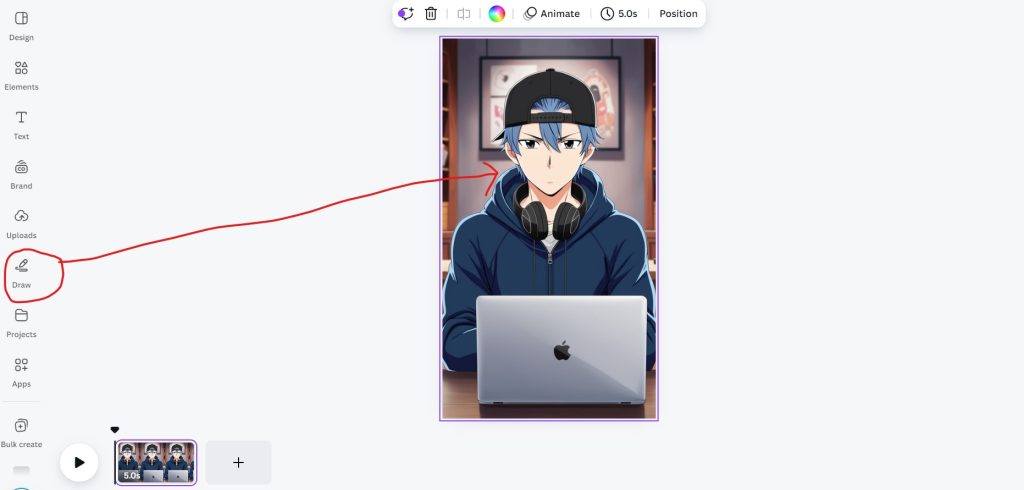
- Create a new blank video template with mobile dimensions.
- Upload the avatar image you generated.
- Adjust the size and placement of the avatar to fit the canvas perfectly.
- Use Canva’s “Draw” feature to make minor adjustments, such as removing the tiny mouth of the avatar!!
You can also enhance your avatar by adding decorative elements such as wall art, accessories, or background items like laptops or vases to give it a more personal touch.
Step 4: Generate a Professional Voiceover with ElevenLabs
To make your avatar even more engaging, you’ll need a lifelike voiceover. ElevenLabs.io provides high-quality voice generation services that will add a professional feel to your avatar.
Creating a Voiceover in 11Labs:
- Prepare a script, either by writing it yourself or generating one with an AI tool like ChatGPT.
- Upload your script to 11Labs.io.
- Select from a variety of realistic voices and generate your voiceover.
- Download the file to use in the next step.
Step 5: Animate Your Avatar’s Voice with Adobe Express
Now it’s time to bring your avatar to life by syncing it with the voiceover. Adobe Express offers a fantastic tool called Animate Your Voice, allowing you to animate your avatar’s mouth movements to match the voice track.
Steps for Animating Your Avatar:
- Sign in to Adobe Express and navigate to the Animate Your Voice tool.
- Upload your avatar and choose the desired mouth style (e.g., happy, neutral, or friendly expressions).
- Upload the voiceover file generated from 11Labs.io and let the tool sync the voice with the avatar.
- Customize the animation and adjust background settings as needed, such as switching to a transparent background for a cleaner look.
👉👉Tip: I RECOMMEND YOU TO WATCH THE VIDEO IN ORDER TO BE IN THE RIGHT WAY AND NOT TO BE LOST IN THIS TURTORIAL !!
Step 6: Finalize Your Avatar Video with Editing Software
The final step is combining your avatar and the animated mouth movements into one cohesive video. For this, you can use any video editing software, such as CapCut, Canva, Filmora, or DaVinci Resolve.
How to Finalize Your Avatar Video:
- Import your avatar image and the animated mouth video into your editing software.
- Overlay the animated mouth on the avatar’s face and adjust for perfect synchronization.
- Make any necessary adjustments to timing and dimensions to ensure seamless lip-syncing.
- Export your completed video and you’re ready to share it with the world.
Conclusion
By following these steps, you can easily create a professional and realistic token avatar that reflects your unique style and message. Using free tools like ChatGPT, AI image generators, Canva, and 11Labs, you can design a high-quality avatar complete with synchronized lip movements, perfect for your YouTube videos and social media presence.
Watch the full tutorial :


